
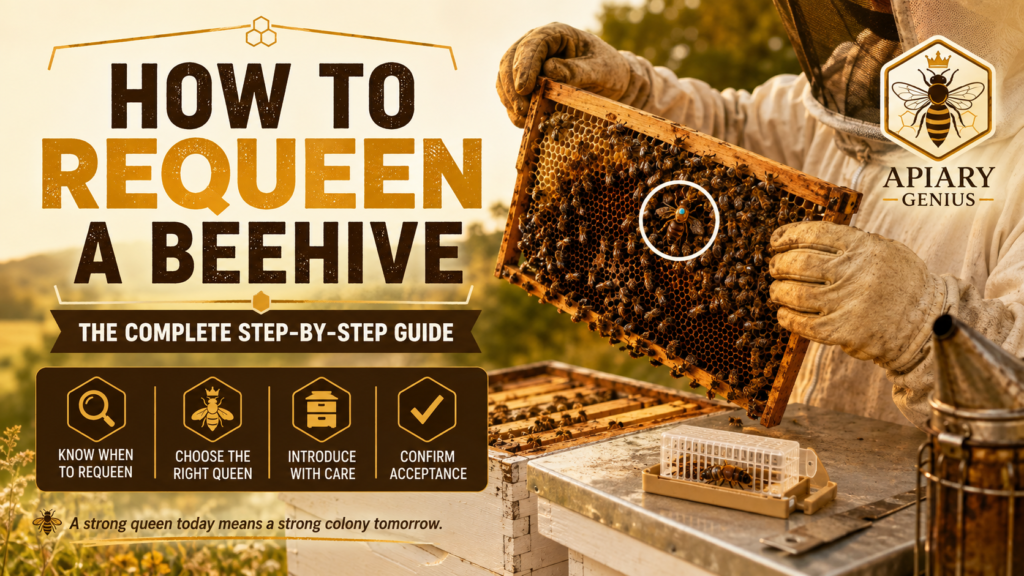
A healthy queen is central to a productive honey bee colony. She lays the eggs that become the next generation of workers, and her pheromones help maintain the colony’s social organization. When a queen becomes unproductive, disappears, or produces undesirable colony traits, replacing her can give the hive a better chance to remain strong.
That process is called requeening.
For a beginner, requeening a hive can feel intimidating. You are removing one of the most important bees in the colony and asking thousands of workers to accept a queen they have never encountered before. Fortunately, successful requeening is much easier to understand when you break it into a clear sequence.
The basic process is to determine whether replacement is actually necessary, remove or confirm the absence of the existing queen, introduce a healthy replacement queen gradually, and then verify that the colony has accepted her and that she has begun laying normally.
This guide explains how to requeen a beehive from beginning to end, including what to look for before requeening, how to introduce a caged queen, how long acceptance may take, and what to do when the colony does not accept the replacement.
Table of Contents
What Does Requeening a Beehive Mean?
Requeening a beehive means replacing the colony’s existing queen with another queen.
In many cases, the beekeeper deliberately removes an old, failing, or undesirable queen and introduces a young, already-mated queen purchased from a reputable queen producer. A beekeeper may also need to introduce a queen when the original queen has died or disappeared.
Colonies can replace queens naturally as well. When workers perceive that their queen is failing, they may build supersedure cells and raise a replacement. A queenless colony with suitable young female larvae can also raise an emergency queen.
However, allowing the colony to raise its own queen takes considerably longer than introducing an already-mated queen. The new virgin queen must emerge, mature, mate successfully, return safely to the colony, and begin laying. Weather, drone availability, predators, and other factors can interfere with that process.
Introducing a mated queen can shorten the brood interruption and gives the beekeeper more control over the queen’s source and genetics.
Requeening should not be viewed simply as putting a new queen into the hive. The workers must accept her. A colony that still recognizes another queen may attack and kill an unfamiliar replacement.
Successful requeening therefore depends heavily on timing and careful introduction.
Why Would You Need to Requeen a Hive?
There is no single schedule that requires every colony to be requeened at the same age. Some queens remain productive longer than others, and management goals vary among beekeepers.
There are, however, several common reasons for replacing one.
Poor brood production is one of the most important. A productive queen normally produces a reasonably solid brood pattern when colony conditions are favorable. If brood becomes persistently sparse or irregular and other causes have been ruled out, the queen may be declining.
A queen may also begin producing an excessive proportion of drones because she is no longer fertilizing enough eggs normally. This can occur as her stored sperm becomes depleted.
Another reason is queen loss or injury. Queens can disappear during inspections, swarming, supersedure, or other colony events. A colony that cannot successfully replace its queen will eventually stop producing new workers.
Beekeepers may also requeen to change colony genetics. Because the queen contributes genetic material to all her daughters, replacing her gradually changes the worker population.
This can be useful when trying to introduce traits such as:
- gentler colony behavior;
- better adaptation to local conditions;
- improved productivity;
- reduced swarming tendency; or
- desirable pest- or disease-related traits from selected breeding stock.
An excessively defensive colony is a common practical example. Requeening with stock selected for gentler behavior will not change the colony overnight because the existing workers remain. As they die naturally and are replaced by daughters of the new queen, colony behavior may gradually change.
Finally, some beekeepers replace queens proactively rather than waiting for obvious failure. Queen productivity often declines with age, although queen performance matters more than age alone.
How to Tell If Your Hive Needs a New Queen
Before replacing a queen, make sure the evidence actually points toward a queen problem.
A disappointing brood pattern does not automatically mean the queen is failing. Poor nutrition, disease, pesticide exposure, seasonal brood reduction, insufficient workers, or other colony stresses can also reduce brood production.
Look at the colony as a whole.
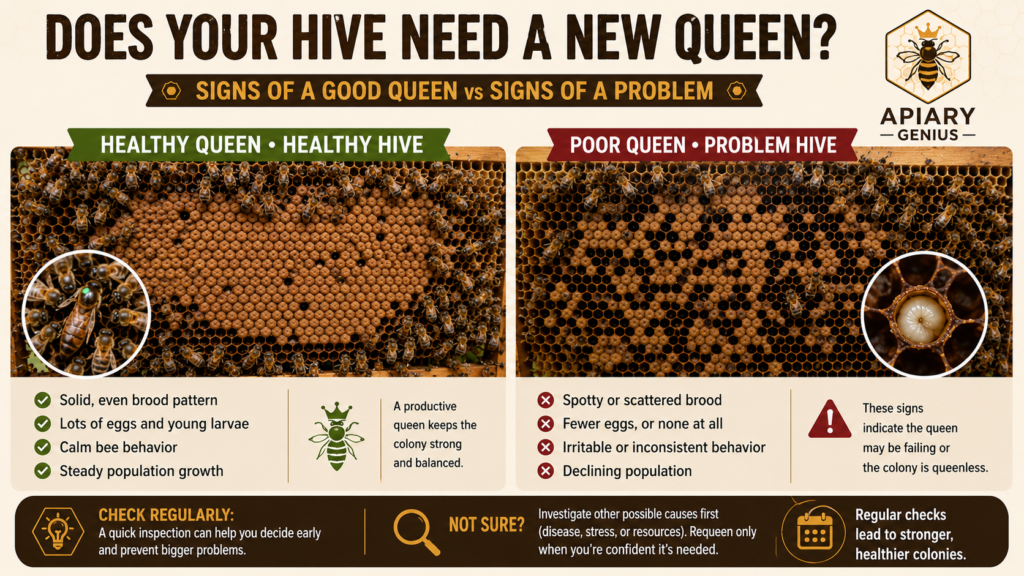
A Persistently Poor Brood Pattern
Healthy brood is usually relatively compact, with larvae and capped brood occupying substantial areas of the comb during active brood-rearing periods.
A failing queen may produce an increasingly scattered pattern with many empty cells among developing brood.
Some empty cells are normal. Workers may remove unhealthy brood, cells may be unavailable for laying, and brood patterns change with season and colony conditions.
The warning sign is a persistent pattern that cannot reasonably be explained by these other factors.
Too Much Drone Brood
A queen that is running out of stored sperm may increasingly lay unfertilized eggs, which develop into drones.
Scattered drone brood appearing where worker brood would normally be expected can therefore indicate queen failure.
Do not confuse this with normal drone production. Healthy colonies deliberately produce drones during the reproductive season, often in dedicated areas of drone-sized comb.
No Eggs or Young Brood
A lack of eggs can indicate queenlessness, but do not immediately assume the queen is gone.
Brood production can temporarily slow because of season, weather, food shortages, swarming, or other conditions.
Inspect carefully for the queen and look at the age distribution of remaining brood. If you see capped brood but progressively fewer young larvae and no eggs over repeated inspections, queen loss becomes increasingly likely.
Supersedure Cells
Workers sometimes construct queen cells because they are replacing a queen whose performance or pheromone output has declined.
A small number of queen cells associated with poor queen performance may indicate supersedure.
Queen cells must still be interpreted in context. Numerous queen cells combined with crowding and other swarm preparations may indicate swarming rather than simple queen failure.
Unwanted Colony Temperament or Genetics
A productive queen can still be replaced if the colony’s inherited characteristics do not fit your management goals.
Extreme defensiveness is one example, particularly when it creates a safety problem for the beekeeper, neighbors, or livestock.
Because colony temperament can also be temporarily affected by queenlessness, weather, nectar availability, robbing, predators, or rough handling, avoid blaming genetics after a single difficult inspection.
When Is the Best Time to Requeen a Beehive?
For many temperate regions, late spring through early summer is a favorable period for requeening because colonies are active and queens are generally more readily available.
Local conditions matter more than a universal calendar date.
The colony should have enough workers and resources to support brood production, and weather should permit normal colony activity.
Fall requeening is also used successfully in some regions. A young queen established before winter may produce workers that contribute to wintering and early spring buildup. However, queen availability and the amount of suitable weather remaining in the season vary considerably by climate.
Requeening becomes more difficult when:
- the colony is extremely weak;
- weather prevents normal inspections;
- resources are severely limited;
- queens are difficult to obtain; or
- the beekeeper cannot return to verify acceptance.
When buying a queen, coordinate delivery with your requeening schedule. You do not want to remove the existing queen and then discover that the replacement will not arrive as expected.
Similarly, avoid leaving a purchased queen caged longer than necessary simply because the receiving colony was not prepared.
The best timing is therefore a combination of season, colony condition, queen availability, and your ability to monitor the introduction.
What You Need Before Requeening a Hive
Requeening does not require a large amount of specialized equipment, but preparation matters.
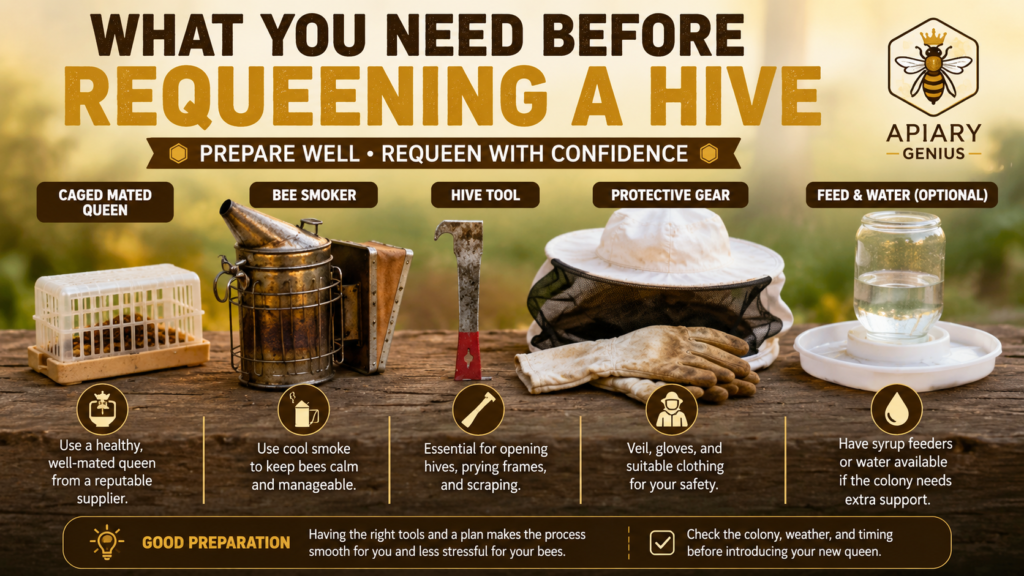
You will normally need:
- a healthy replacement queen from a reputable source;
- standard protective clothing;
- a smoker;
- a hive tool;
- the queen cage and candy release system supplied with the queen;
- enough time to inspect the colony carefully; and
- a plan for follow-up inspections.
For most beginners, a mated queen in an introduction cage is the simplest option.
The cage protects her from immediate attack while allowing workers to encounter her scent. Many commercial queen cages contain candy that workers gradually remove, creating a delayed release.
Before beginning, inspect the replacement queen if possible without unnecessarily opening the cage.
Confirm that she is alive and moving normally.
Also understand how the particular cage works. Some designs have a candy end covered by a cork or cap that must be removed at installation, while others may differ. Follow the queen producer’s instructions rather than assuming every cage operates identically.
Most importantly, make sure you know what is happening inside the receiving colony before installing her.
How to Requeen a Beehive Step by Step
The following procedure describes a common approach for replacing an existing queen with a purchased, mated queen in a cage.
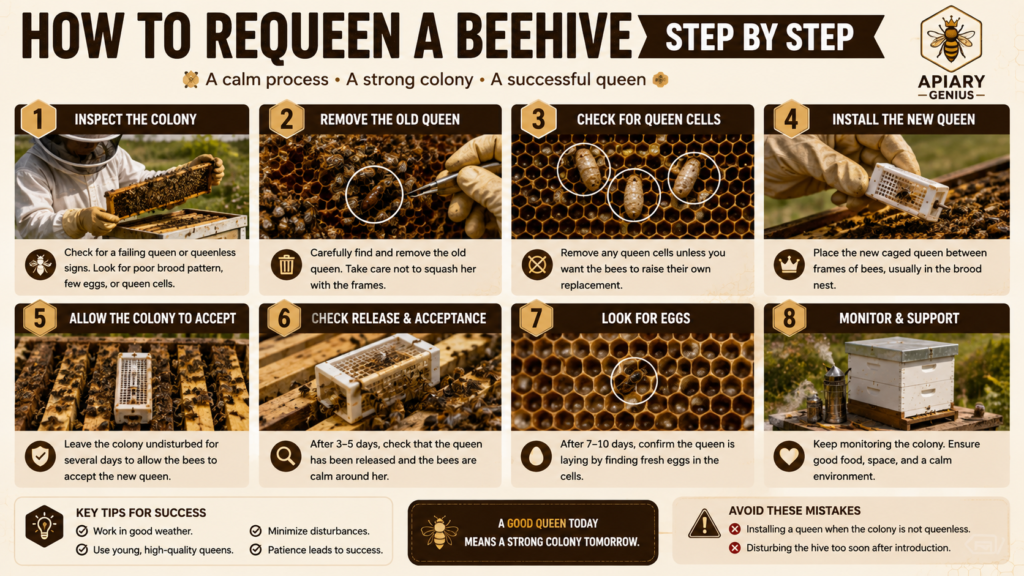
Step 1: Inspect the Colony Carefully
Begin with a normal inspection, choosing a suitable time to inspect the beehive so you can evaluate the colony properly.
Evaluate brood pattern, food stores, colony strength, temperament, queen cells, and signs of disease or other problems.
This is your opportunity to confirm that requeening is justified rather than treating a different colony problem as a queen problem.
If the hive is already believed to be queenless, inspect carefully for eggs, larvae, queen cells, or another queen before proceeding.
Step 2: Find the Existing Queen
If the colony is queenright, locate the existing queen.
Finding her is sometimes the most time-consuming part of requeening.
Start in the brood nest and examine each frame methodically. Look not only for the queen herself but also for the pattern of worker movement around her.
If you cannot find her, do not introduce the new queen simply because you have searched once.
A hidden existing queen can result in the replacement being rejected and killed.
Take your time, reorganize the frames carefully, and search again if necessary.
Step 3: Remove the Old Queen
Once you are certain you have located the correct queen, remove her from the colony.
The receiving colony needs to become queenless before the replacement is safely established.
Do not leave the old queen loose in the hive and assume the workers will choose the new one. Introducing a caged queen into a colony that still has a functional queen greatly increases the risk of rejection.
Step 4: Allow the Colony to Recognize That It Is Queenless
After removing the old queen, many introduction methods provide a queenless interval before installing the replacement.
Recommendations vary with the method and colony. A period of roughly a day or two is commonly used, while some difficult colonies may be left longer.
This interval allows the influence of the previous queen’s pheromones to decline and the colony to recognize its queenless state.
Longer is not automatically better, however.
Once queenless workers have suitable eggs or young larvae, they can begin constructing emergency queen cells. Those cells can compete with your introduction plan.
The goal is a controlled queenless interval, not neglecting the colony for an extended period.
Step 5: Check for Queen Cells
Before introducing the purchased queen, inspect the brood nest for queen cells.
If the workers have begun raising their own queen and your plan is to establish the purchased queen, those cells should generally be removed.
Inspect carefully. Missing a queen cell can contribute to rejection of the introduced queen or result in a later conflict between queens.
This check also provides another opportunity to notice evidence that the colony may not have been truly queenless.
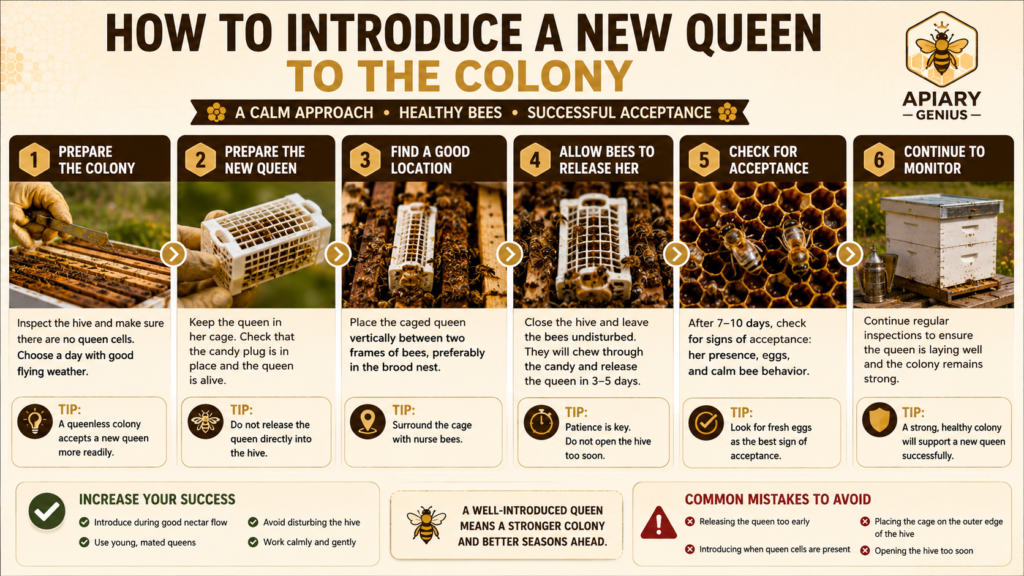
Step 6: Position the Caged Queen in the Brood Nest
Place the queen cage in the brood area where workers are abundant and temperatures are relatively stable.
The cage should be secured so that it cannot fall to the bottom of the hive.
Orientation depends partly on cage design. The important point is that workers can contact the cage and that the candy release remains accessible and functional.
Follow any specific orientation instructions supplied by the queen breeder.
Step 7: Allow Gradual Introduction
Do not simply open the cage and release the queen immediately into an unfamiliar colony.
Gradual introduction gives workers time to become accustomed to her pheromones while the cage physically protects her.
If the cage uses candy release, workers gradually consume the candy until the exit opens.
The delay gives the colony and queen time to acclimate to one another.
Step 8: Minimize Disturbance
After installation, close the hive carefully.
Avoid unnecessary inspections during the critical introduction period.
Repeatedly opening the colony, moving the cage, or handling the queen does not help acceptance and can add stress.
Your next inspection should have a specific purpose: determining whether the queen has been released and whether the colony appears to be accepting her.
Step 9: Confirm Release and Acceptance
When you return, examine the queen cage and worker behavior.
If the queen has already been released, do not immediately tear the entire colony apart looking for her unless there is a clear reason.
If she remains inside, evaluate how workers are behaving toward the cage before considering manual release.
Calm workers walking over the cage are more encouraging than workers tightly gripping or biting it.
If the bees appear aggressive toward the queen, keep her protected and investigate why.
Step 10: Confirm That the New Queen Is Laying
Acceptance is not fully confirmed simply because the cage is empty.
The final goal is an established, laying queen.
During a later inspection, look for eggs and young larvae arranged in a normal worker-brood pattern.
Finding the marked replacement queen can provide additional confirmation, but seeing correctly laid eggs is often more useful than repeatedly searching for her.
Once normal egg laying has begun and the colony is behaving normally, the requeening process can generally be considered successful.
How to Introduce a New Queen to the Colony
Queen introduction deserves special attention because this is where many requeening attempts fail.
Honey bee colonies recognize queens largely through chemical communication. An unfamiliar queen placed directly into a colony may be treated as an intruder.
The cage provides a controlled transition.
Workers can approach the queen, contact the cage, and become exposed to her pheromones without immediately being able to sting or ball her.
Watch the Workers, Not Just the Queen
Worker behavior around the cage can provide useful clues about acceptance.
Positive behavior may include bees moving calmly across the cage and tending or feeding the queen through the mesh.
Potential rejection behavior includes workers tightly clinging to the cage and biting or aggressively gripping the screen.
Do not manually release a queen into a colony that is clearly showing aggressive behavior toward her.
Instead, keep her protected while determining why the colony is resisting her.
Possible explanations include:
- another queen is still present;
- a virgin queen is present;
- the colony has queen cells;
- the previous queen was removed too recently; or
- the colony is otherwise in a condition that makes introduction difficult.
Candy Release vs. Direct Release
For beginners, gradual release through candy is generally safer than immediately releasing a queen onto the comb.
Direct release removes the cage’s protection before the beekeeper knows whether workers have accepted her.
If the queen has not been released after the expected period, first determine why. A blocked candy passage or improperly prepared cage is different from active worker rejection.
Do not force release merely because a certain number of days has passed.
The behavior of the colony matters.
How Long Does It Take Bees to Accept a New Queen?
There is no exact acceptance time that applies to every colony.
With a standard caged, mated queen, the introduction and release process commonly takes several days. Establishment and visible egg laying may take longer.
A broad range of approximately 4 to 15 days from introducing a mated queen to having a laying queen illustrates why a rigid deadline can be misleading.
Several factors influence the process:
- whether the colony is truly queenless;
- how long it has been queenless;
- whether queen cells are present;
- colony temperament;
- the queen’s reproductive condition;
- the introduction method;
- weather and resource conditions; and
- the amount of disturbance during introduction.
The important distinction is between release, acceptance, and successful establishment.
A queen can leave the cage without being fully established.
Likewise, workers appearing calm around the cage is encouraging but does not prove she will become a productive laying queen.
The strongest confirmation comes later when you find eggs and developing worker brood from the replacement queen.
How to Know If the New Queen Has Been Accepted
There are several stages of evidence.
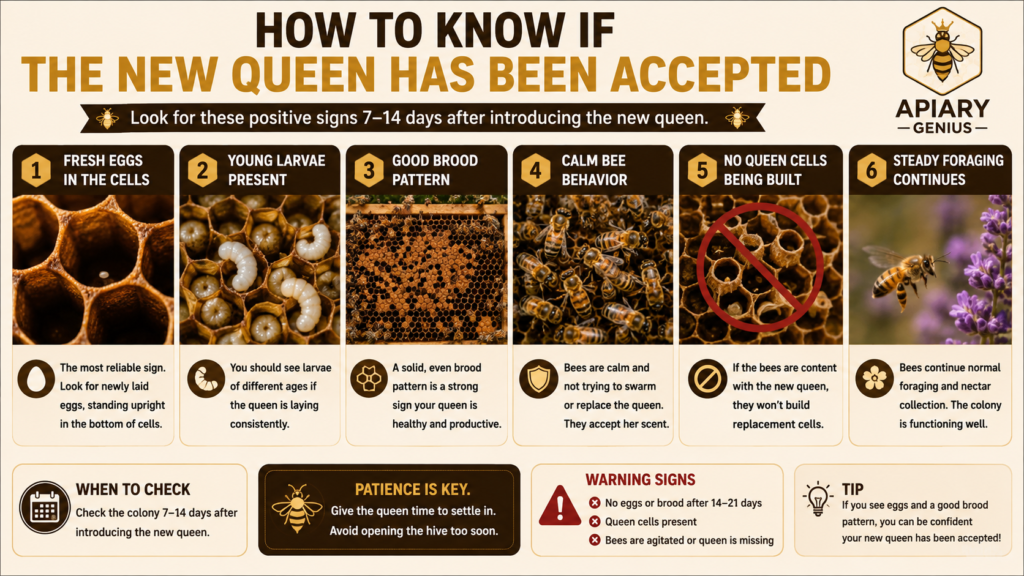
First, worker behavior around the cage should become calm rather than aggressive.
Next, the queen should be released safely.
After release, the colony should allow her to move normally on the comb without balling or attacking her.
Eventually, you should find the strongest practical evidence: fresh eggs and young brood.
When inspecting for eggs, remember that eggs alone do not always prove that a normal queen is present. Laying workers can also produce eggs, although their pattern is usually different.
A healthy mated queen typically lays a single egg near the bottom center of a cell. As she establishes a brood nest, you should begin seeing an organized worker-brood pattern.
You may also see workers surrounding and attending the queen. This retinue behavior is part of the colony’s response to queen pheromones.
If the queen is marked, identifying her is easier and can help confirm that the laying queen is actually the one you introduced rather than a queen raised by the colony.
Do not overinspect simply to see her.
Once you have good evidence of normal laying and colony stability, give the queen room to establish her brood pattern.
What to Do If the Colony Rejects the New Queen
Queen rejection is frustrating, but the cause should be investigated before another queen is introduced.
If the replacement queen is still alive inside her cage and workers are aggressively gripping or biting it, do not release her.
First determine whether the colony is actually queenless.
Search again for:
- the original queen;
- a virgin queen;
- queen cells; or
- evidence that a new queen may already have emerged.
A colony that already considers itself queenright has little reason to accept your replacement.
If queen cells are present and your objective remains to introduce the purchased queen, remove them and re-evaluate the colony.
If the introduced queen has already disappeared or been killed, avoid immediately placing another expensive queen into the same unresolved situation.
Determine why the first attempt failed.
Persistent rejection can indicate that another queen is present even when the beekeeper has been unable to find her.
Colony condition matters as well. A severely stressed, diseased, extremely weak, or laying-worker colony may require additional management beyond ordinary queen introduction.
The key principle is simple:
Do not solve unexplained queen rejection by repeatedly adding more queens. Solve the underlying colony condition first.
Can You Requeen a Queenless Hive?
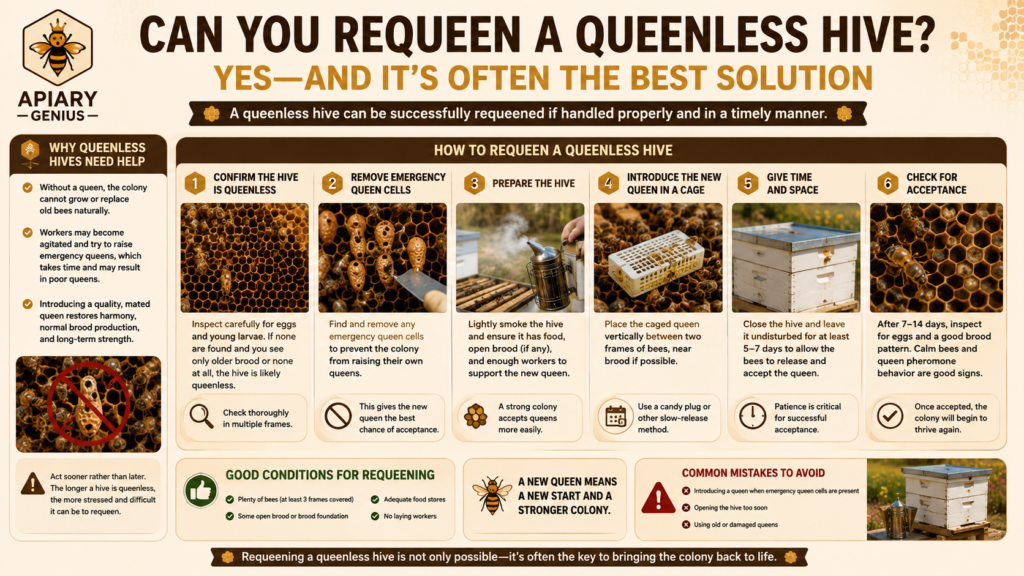
Yes. In fact, a genuinely queenless colony can be an appropriate candidate for a replacement queen.
But “I couldn’t find the queen” and “this colony is definitely queenless” are not the same thing.
Before introducing a replacement, look at the brood.
If eggs are present, a queen was laying very recently unless laying workers have developed.
If only older larvae and capped brood remain, queen loss may have occurred several days earlier.
Emergency queen cells indicate that workers have recognized queenlessness and are attempting to replace her.
What If the Colony Has Been Queenless for a Long Time?
Long-term queenlessness is more complicated.
Without queen pheromones and open brood for an extended period, some worker bees can develop active ovaries and begin laying unfertilized eggs.
These are called laying workers.
Because worker bees do not mate, their eggs are unfertilized and develop into drones.
Signs may include:
- multiple eggs in individual cells;
- eggs attached to cell walls rather than neatly placed at the bottom;
- scattered drone brood in worker-sized cells; and
- a highly disorganized brood pattern.
A laying-worker colony can be much harder to requeen successfully because the colony’s social and pheromonal condition has changed.
Simply putting a purchased queen cage into such a hive may result in rejection.
Management options vary depending on colony strength and the beekeeper’s resources. They can include combining the colony with a healthy queenright colony or using brood and other management techniques to restore normal colony conditions before attempting another introduction.
For a beginner with a small, declining laying-worker colony, combining it with a healthy colony may sometimes be more practical than repeatedly sacrificing purchased queens.
Common Requeening Mistakes to Avoid
Requeening problems often come from a few predictable mistakes.
Introducing a new queen while the old queen is still present is one of the most serious. A queenright colony will usually resist an unfamiliar queen.
Another common mistake is assuming the hive is queenless simply because you did not see the queen during one inspection. Queens can be remarkably difficult to find, especially in large colonies.
Ignoring queen cells can also disrupt the process. If the colony is already raising a replacement, it may reject the queen you are trying to introduce.
Avoid releasing the queen too quickly. The introduction cage exists for a reason. Immediate release exposes an unfamiliar queen to workers before acceptance has developed.
At the other extreme, do not keep opening the colony repeatedly to check on her. Excessive disturbance during introduction is unnecessary.
Another mistake is blaming every poor brood pattern on the queen. Before replacing her, consider nutrition, disease, colony population, season, comb condition, and other stresses.
Be careful about waiting too long to verify success as well. You do not need to inspect constantly, but you do need to confirm that a laying queen eventually becomes established.
Finally, do not repeatedly introduce replacement queens into a colony that keeps killing them without investigating the cause.
Rejection is information.
It may be telling you that another queen exists, that queen cells are present, or that the colony is in a condition requiring a different management strategy.
Frequently Asked Questions About Requeening a Hive
How often should you requeen a beehive?
There is no mandatory interval for every hive.
Some beekeepers replace queens proactively every year or two, while others requeen according to performance. Queen productivity commonly declines as queens age, but colony condition and queen performance are more useful management signals than age alone.
A productive queen with a good brood pattern does not automatically need replacement simply because a calendar date has arrived.
Do you have to kill the old queen before introducing a new one?
The old queen must be removed from the receiving colony before a replacement is established.
If both queens are present, workers may reject and kill the unfamiliar queen.
How a beekeeper handles the removed queen is a separate management decision, but she should not remain loose in the colony being requeened.
How long should a hive be queenless before introducing a new queen?
There is no universal interval for every introduction method.
A controlled queenless period, often around a day or two, is commonly used before introducing a caged mated queen, while some colonies may require different management.
The goal is to give the colony time to recognize queenlessness without allowing the situation to progress unnecessarily.
Should I remove queen cells before introducing a new queen?
If your plan is to establish a purchased mated queen, queen cells should generally be removed during preparation and checked again as appropriate.
A colony committed to raising its own queen may be less willing to accept the one you provide.
Can I put a new queen directly into the hive?
Direct release can be risky, particularly for beginners.
A queen introduction cage provides protection while workers become accustomed to the new queen. Gradual introduction is therefore generally preferable to simply placing an unfamiliar queen onto the comb.
How soon should the new queen start laying?
A successfully introduced mated queen may begin laying within several days, but establishment varies.
Do not assume failure because eggs are not visible immediately after release.
Give the colony reasonable time, then inspect for eggs and young brood.
What if I can’t find the old queen?
Do not risk an expensive replacement until you have stronger evidence that the old queen is gone.
Inspect systematically and use brood evidence to help determine the colony’s status.
If necessary, inspect again rather than assuming that failing to spot her means she is absent.
Can bees raise their own queen instead?
Yes, provided the colony has suitable young female larvae and enough resources and nurse bees.
Raising a queen naturally takes longer because the queen must develop, emerge, mature, mate successfully, and begin laying.
Introducing an already-mated queen is generally faster and gives the beekeeper more control over genetics.
Will requeening make an aggressive hive calmer immediately?
No.
Even if the colony accepts a queen from gentler stock, most existing workers are daughters of the previous queen.
Temperament may change gradually as older workers die and are replaced by daughters of the new queen.
Also remember that genetics are not the only cause of defensive behavior. Queenlessness, robbing, weather, food shortages, predators, and management disturbance can temporarily make colonies more defensive.
What happens if the new queen is rejected?
If she is still protected in her cage, do not release her while workers are behaving aggressively toward her.
Check for another queen and queen cells and reassess colony conditions.
If she has already been killed, determine the likely reason before attempting another introduction.
Final Thoughts
Learning how to requeen a hive is less about physically replacing one bee and more about understanding the colony’s queen status.
A successful requeening begins before the replacement queen ever enters the hive. First determine whether the existing queen truly needs replacement. Then confirm whether the colony is queenright or queenless, remove the old queen when necessary, manage any queen cells, and introduce the replacement gradually.
After that, patience becomes important.
Do not assume that an empty queen cage means the job is finished. Watch for normal colony behavior, then confirm that the replacement queen is alive, accepted, and producing healthy worker brood.
When requeening fails, avoid immediately trying the same procedure again. Queen rejection usually has a reason, and finding that reason can save both the replacement queen and the colony.
Handled carefully, requeening is a practical management skill that allows beekeepers to address failing queens, restore queenless colonies, and deliberately influence the genetics and future performance of their bees.