
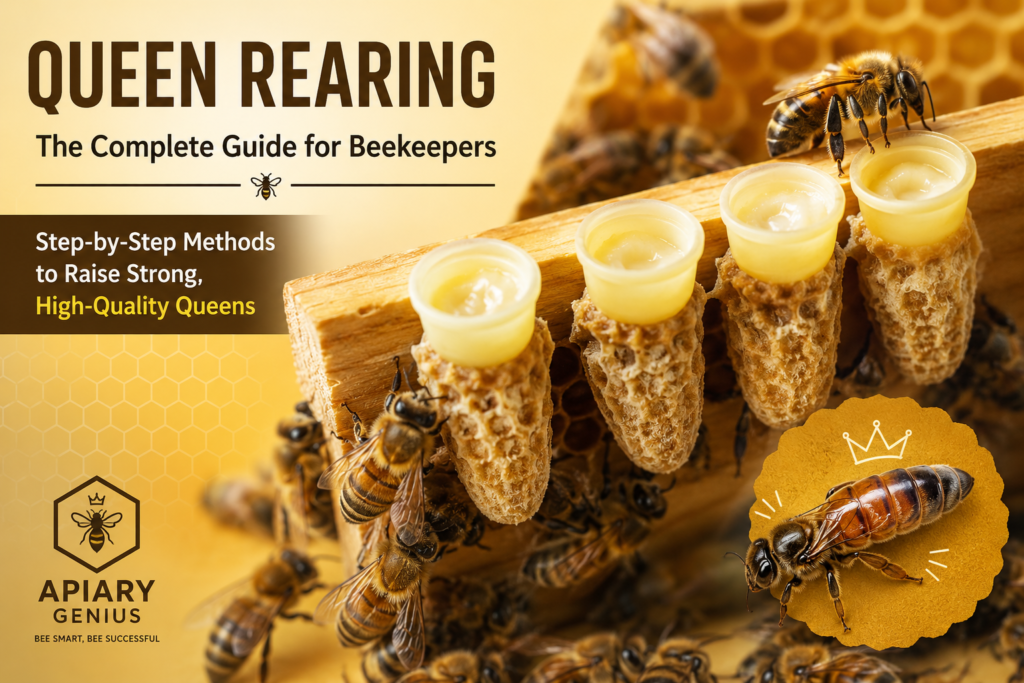
Queen rearing is one of the most rewarding and technically demanding skills a beekeeper can develop. While most beginners start out buying mated queens from a supplier, sooner or later many beekeepers become curious about queen rearing as a way to save money, improve the genetics of their apiary, and gain a deeper understanding of how a colony actually works. This guide walks through everything a beekeeper needs to know to get started with queen rearing, from the biology behind it to the step-by-step methods used by both hobbyists and commercial operations.
Whether you manage two hives in a backyard or twenty across several apiaries, queen rearing is a skill that pays off season after season. Once you understand the timing, the tools, and the underlying logic, queen rearing stops feeling like a mysterious craft reserved for experts and starts feeling like a natural extension of everyday hive management.
Table of Contents
What Is Queen Rearing?
At its core, queen rearing is the deliberate process of encouraging a colony to raise new queens under conditions the beekeeper controls, rather than leaving it entirely to chance. In nature, colonies raise queens for three main reasons: supersedure (replacing a failing queen), swarming (colony reproduction), or emergency replacement (after the sudden loss of a queen). Queen rearing takes advantage of these natural instincts but directs them toward a specific outcome chosen by the beekeeper.
Instead of waiting for a colony to decide on its own when and how to raise a queen, queen rearing lets you choose which colony’s genetics to propagate, when the process begins, and how many queen cells are produced. This level of control is what separates queen rearing from simply “letting the bees sort it out.
Why Beekeepers Take Up Queen Rearing
There are several practical reasons beekeepers move from buying queens to practicing queen rearing themselves.
Cost savings.
A single mated queen from a reputable breeder can cost a significant amount, and prices rise every season. If you manage several colonies or plan to expand your apiary, queen rearing quickly pays for itself.
Genetic selection.
Queen rearing allows you to propagate traits you actually want in your operation, such as gentleness, strong honey production, disease resistance, or overwintering ability. Commercial queen suppliers breed for broad appeal, but queen rearing lets you breed specifically for your own climate and management style.
Local adaptation.
Queens raised through your own queen rearing program are the daughters of colonies that have already proven themselves in your local conditions. Over time, queen rearing from your best-performing colonies builds a more resilient, locally adapted population of bees.
Timely replacements.
When a queen fails or a colony becomes queenless unexpectedly, having queen rearing skills means you are not dependent on a supplier’s shipping schedule. You can raise a replacement queen from your own resources within a few weeks.
Deeper beekeeping knowledge.
Queen rearing forces a beekeeper to understand colony development, brood biology, and timing at a much deeper level than routine hive management requires. Many beekeepers say that learning queen rearing changed how they read a hive permanently.
Queen Biology: What You Need to Understand Before You Begin
Successful queen rearing depends on understanding a few key biological facts about how queens develop.
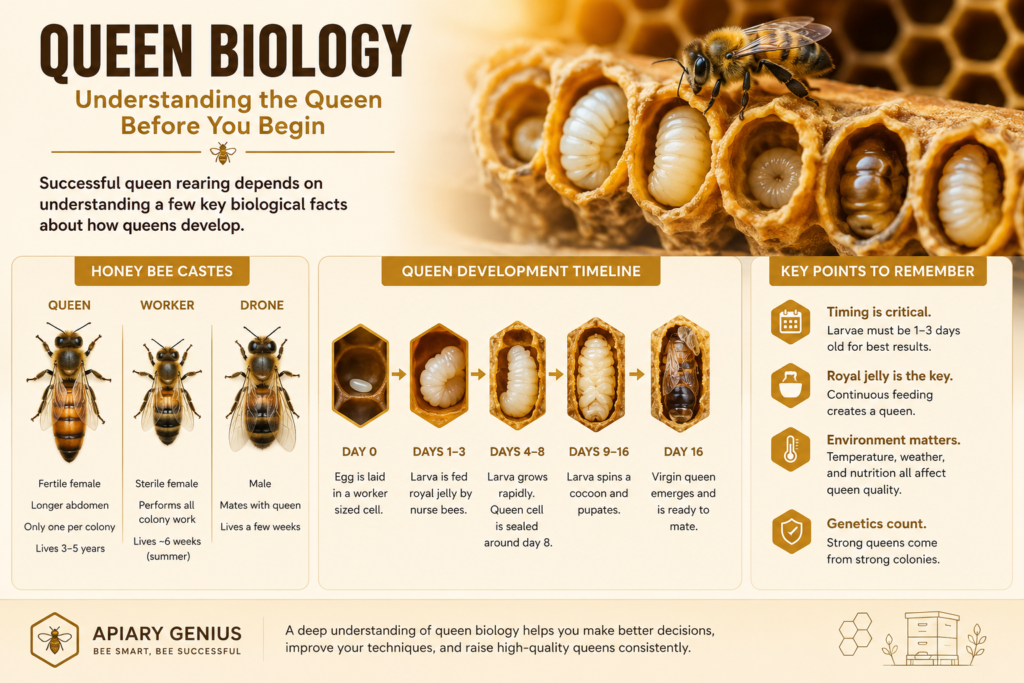
A fertilized egg can become either a worker bee or a queen, depending entirely on how it is fed during larval development. Larvae destined to become workers are fed a mixture of pollen and diluted royal jelly after the first few days. Larvae destined to become queens are fed pure, undiluted royal jelly throughout their entire larval stage. This continuous royal jelly diet triggers different genetic expression, resulting in a queen with fully developed ovaries, a longer body, and a much longer lifespan.
Timing is critical in queen rearing. A queen develops from egg to emergence in about 16 days, compared to 21 days for a worker and 24 days for a drone. Understanding this timeline is essential because queen rearing techniques rely on grafting or selecting larvae at a very specific and narrow age window — ideally under 24 hours old, and no older than 72 hours.
After emerging, a virgin queen takes another 5 to 10 days before she is sexually mature enough to fly out on mating flights. She typically mates with 10 to 20 drones over one or more flights, storing enough sperm in her spermatheca to lay fertilized eggs for the rest of her life, which can be several years. This mating window is one of the most vulnerable and unpredictable stages of queen rearing, since weather, drone availability, and predation can all affect success rates.
Research from university extension programs on honey bee biology confirms this feeding-based development process.
When to Start Queen Rearing
Timing is one of the most important variables in successful queen rearing. Queen rearing should generally begin in mid-to-late spring, once colonies are strong, drone populations are well established, and consistent warm weather supports both larval development and queen mating flights.
Starting queen rearing too early in the season is a common mistake. If drones are not yet mature and abundant in the area, newly reared queens may struggle to mate successfully, resulting in poorly mated or drone-laying queens. Most experienced beekeepers wait until drone brood has been present in colonies for several weeks before beginning queen rearing, since drones need about 24 days to develop and additional time to reach sexual maturity.
On the other end of the calendar, queen rearing late in the season carries its own risks. Queens raised too late may not have enough time to mate and begin laying before colder weather arrives, leaving colonies queenless heading into winter. As a general guideline, most temperate-climate beekeepers plan their queen rearing activities to be completed by mid-summer, giving new queens plenty of time to establish strong laying patterns before autumn.
Selecting Breeder Colonies for Queen Rearing
The single biggest factor determining the long-term success of any queen rearing program is breeder selection. Queen rearing is only as good as the genetics you start with — grafting larvae from a mediocre colony will always produce mediocre queens, regardless of how technically perfect your queen rearing process is.
When choosing breeder colonies for queen rearing, look for:
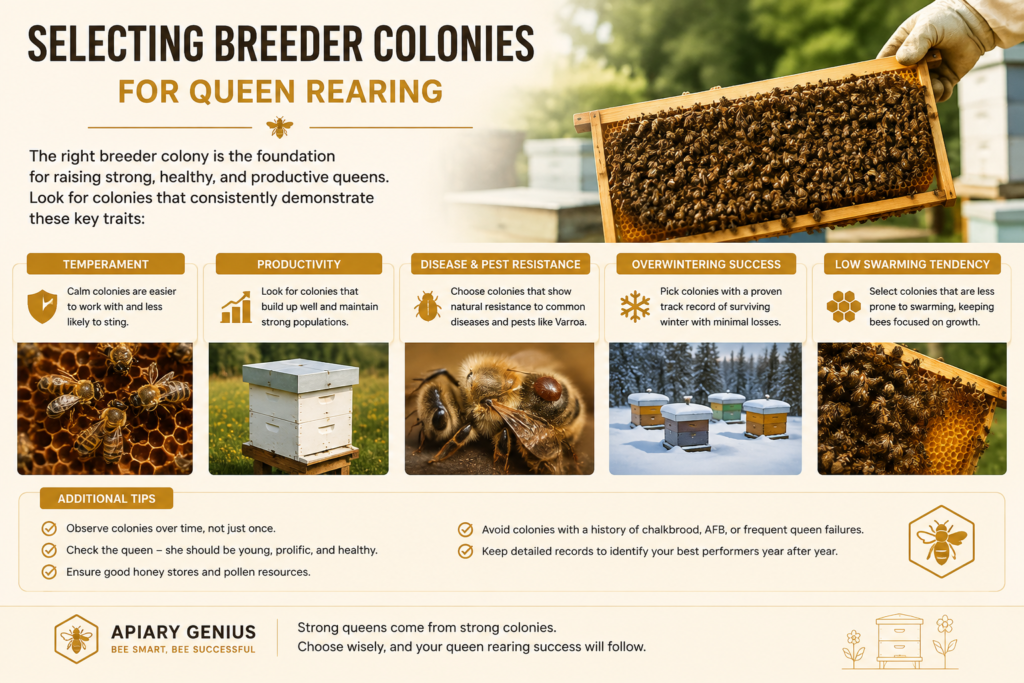
Temperament
Choose colonies that are calm and easy to work, since this trait is heritable and directly affects how pleasant future beekeeping will be.
Productivity
Favor colonies with strong, consistent honey production over multiple seasons rather than a single exceptional year.
Disease and pest resistance
Colonies that show natural resistance to varroa mites or that recover quickly from minor disease pressure are excellent candidates for queen rearing.
Overwintering success
A colony that consistently comes through winter strong is demonstrating traits worth propagating through queen rearing.
Low swarming tendency
Colonies that rarely swarm unpredictably tend to pass this stability on to their daughter queens.
Many beekeepers keep informal notes across a full season before selecting breeder colonies for their queen rearing efforts, since a single hive inspection is not enough information to judge long-term colony quality.
Methods of Queen Rearing
There are several established methods of queen rearing, ranging from simple techniques suitable for beginners to more advanced systems used by commercial queen producers. Choosing the right method depends on your experience level, the number of queens you need, and the tools you have available.
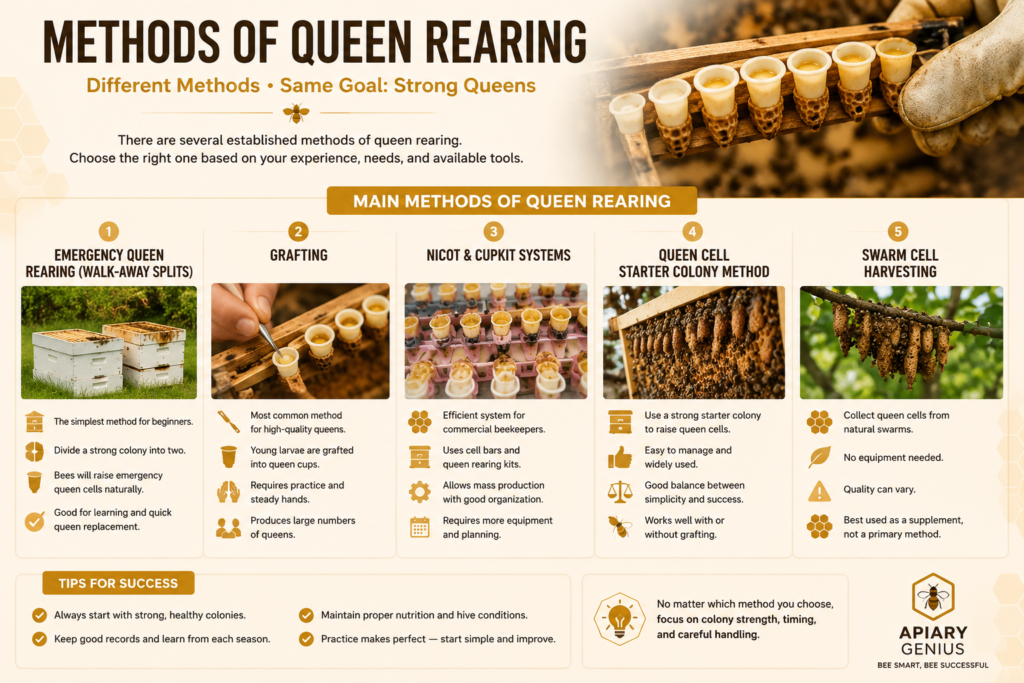
Emergency Queen Rearing (Walk-Away Splits)
This is the simplest form of queen rearing and a good starting point for beginners. To perform an emergency queen rearing split, you divide a strong colony into two, making sure the queenless half has frames containing eggs and very young larvae. The bees in the queenless half will recognize their loss and begin the natural process of raising emergency queen cells from the young larvae available.
The advantage of this queen rearing method is its simplicity — no grafting tools or specialized equipment are needed. The disadvantage is reduced control: you cannot choose exactly which larvae become queens, and the bees may select larvae that are already slightly too old, resulting in queens of lower quality than those produced through more controlled queen rearing methods.
Grafting
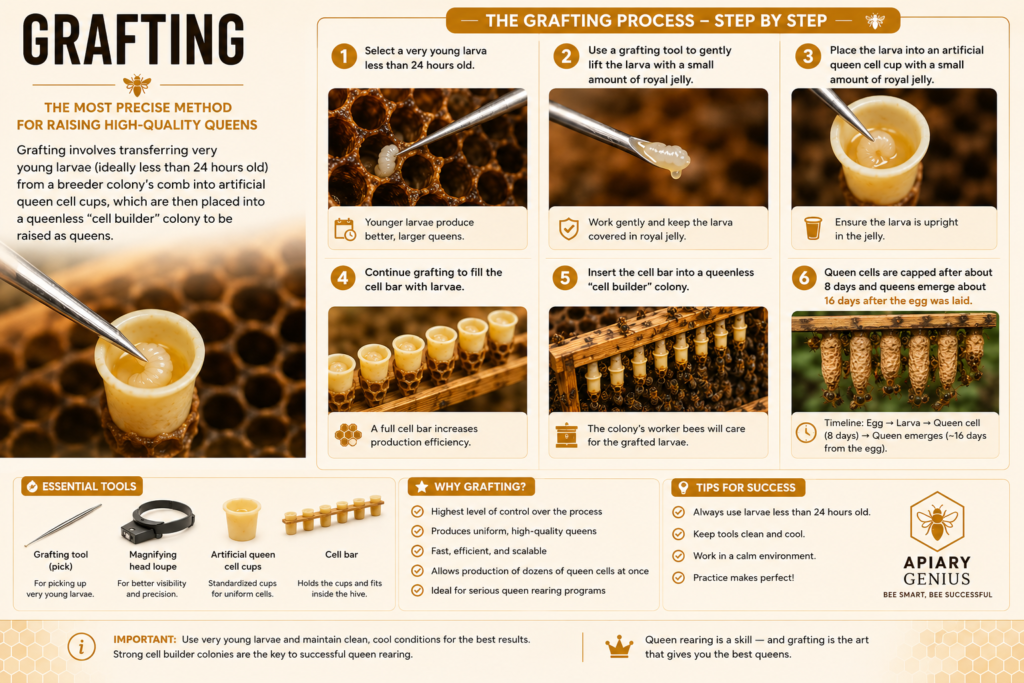
Grafting is the most widely used technique in serious queen rearing programs, and it offers the highest degree of control over the process. Grafting involves physically transferring very young larvae (ideally less than 24 hours old) from a breeder colony’s comb into artificial queen cell cups, which are then placed into a queenless “cell builder” colony to be raised as queens.
Grafting requires a grafting tool (a small, flexible pick), a magnifying lamp or headband loupe for visibility, and artificial cell cups mounted on cell bars. While grafting has a learning curve, most beekeepers find that with practice, queen rearing through grafting becomes a fast and reliable process capable of producing dozens of high-quality queen cells at once.
Cell Punch Method
The cell punch method is a beginner-friendly alternative to traditional grafting within queen rearing. Instead of manually transferring larvae with a grafting tool, this method uses a device to “punch” out a section of comb containing a larva of the correct age, cell wall and all, and mount it directly into a queen cell holder. Because the larva remains in its original wax cell, cell punch queen rearing eliminates the risk of larval damage during transfer, making it a popular choice for beekeepers newer to queen rearing.
Nicot and Cupkit Systems
These are enclosed plastic systems designed to simplify queen rearing further by controlling exactly where the queen lays her eggs. The queen is confined for about 24 hours inside a special cage fitted with plastic cell cups. Once she lays eggs directly into the cups, the cage is removed and the cell-cup bar is transferred into a cell builder colony. This queen rearing method removes the need for grafting altogether, since the larvae are already correctly placed by the time they hatch.
Splitting and Swarm Cell Harvesting
Some beekeepers practice a form of passive queen rearing by monitoring colonies that are naturally preparing to swarm and carefully harvesting the swarm cells they produce, distributing them into queenless nucs. While this method requires less hands-on manipulation, it depends entirely on colonies choosing to swarm on their own schedule, making it less predictable than active queen rearing methods like grafting.
Setting Up a Cell Builder Colony
Regardless of which queen rearing method you use to introduce larvae, you will need a strong “cell builder” colony to actually raise the queen cells to completion. A good cell builder colony for queen rearing needs:
- A large population of young nurse bees, since these are the bees responsible for producing royal jelly and feeding developing queen larvae
- Abundant pollen and honey stores to support the intensive feeding queen cells require
- No queen present, or a queen physically separated by a queen excluder, so the colony’s nurse bees direct their energy toward the introduced queen cells rather than tending an existing queen’s brood
Two common approaches are used in queen rearing to prepare cell builder colonies: the queenless method, where a strong colony is made fully queenless a few hours before introducing grafted cells, and the queenright method, where a queen excluder separates the queen into a lower box while grafted cells are introduced above. Each approach has trade-offs in terms of colony strength and acceptance rates, and many experienced queen rearing practitioners experiment with both before settling on a preferred system.
Step-by-Step: A Basic Grafting-Based Queen Rearing Process
For beekeepers ready to move beyond emergency splits, here is a simplified overview of a grafting-based queen rearing process:
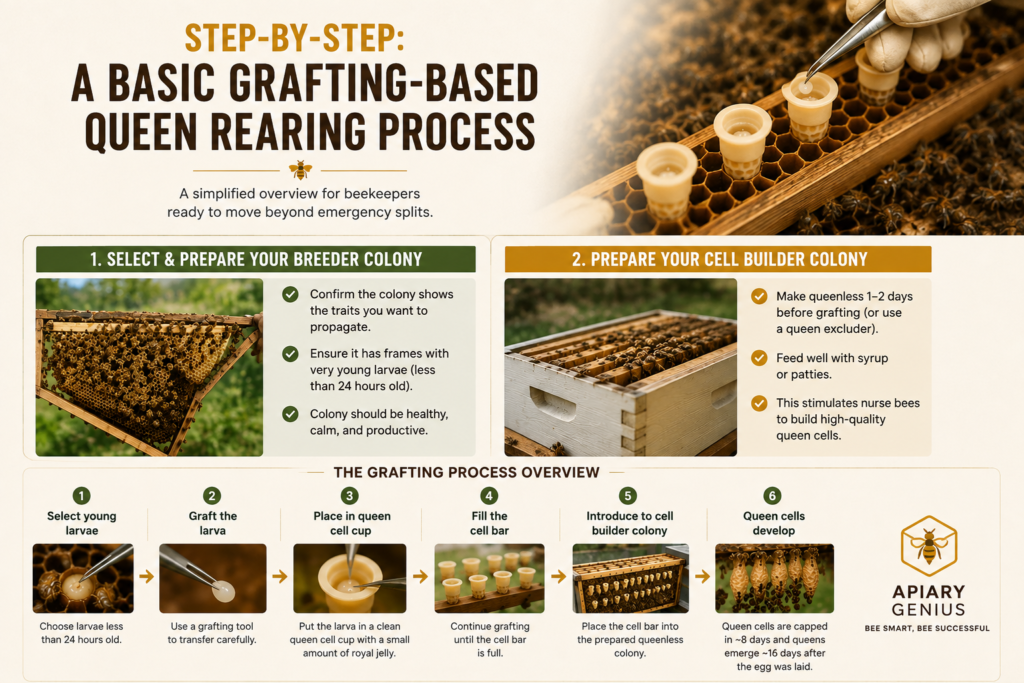
Select and prepare your breeder colony
Confirm the colony shows the traits you want to propagate through queen rearing, and ensure it has frames with young larvae available on grafting day.
Prepare your cell builder colony
One or two days before grafting, make the cell builder colony queenless (or install a queen excluder), and feed it well to stimulate nurse bee activity.
Graft the larvae
Using a grafting tool, carefully transfer larvae under 24 hours old from the breeder colony into prepared cell cups mounted on a cell bar frame. Speed and gentleness both matter here, since larvae are extremely delicate and can be damaged or dried out quickly.
Introduce the grafted frame
Place the cell bar frame into the prepared cell builder colony, positioned near brood and food stores where nurse bees will readily find and tend it.
Check for acceptance
After 24 to 48 hours, check how many of the grafted cells have been accepted and are being drawn out into queen cells. Acceptance rates vary widely and improve significantly with queen rearing experience.
Move cells before emergence
About 10 days after grafting, queen cells need to be moved into mating nucs or protected with cell protectors, since queens can emerge and kill rival queen cells if left together too long.
Allow queens to emerge and mate
Once distributed into mating nucs, queens will emerge, mature, and fly out to mate over the following one to two weeks.
Confirm laying
Check mating nucs two to three weeks after queen emergence for evidence of a laying queen — a solid brood pattern is the clearest sign that the queen rearing process has succeeded.
Mating Nucs: The Overlooked Half of Queen Rearing
Many beginners focus heavily on the grafting or larval-selection stage of queen rearing while underestimating how important mating nucs are to overall success. A mating nuc is a small, temporary colony — sometimes housing just a few hundred bees on miniature frames — created specifically to host a single virgin queen through her maturation and mating flights.
Mating nucs need enough bees to keep the queen warm and fed, a small amount of food storage, and a location with good drone density nearby. Poorly stocked or poorly placed mating nucs are one of the most common causes of queen rearing failure, since a queen without adequate care during this critical stage may fail to mate successfully or may be lost entirely.
Introducing New Queens to Colonies
Once a queen produced through queen rearing has proven herself to be laying well in a mating nuc, she can be introduced into a larger colony that needs a queen — whether that colony lost its previous queen, is being split, or is simply being requeened as part of routine management.
Direct introduction of a new queen is risky, since worker bees may perceive her as a stranger and kill her. Most successful queen rearing programs use a push-in cage or a slow-release candy cage, allowing worker bees several days to become accustomed to the new queen’s pheromones before she is released to move freely through the colony.
Common Mistakes in Queen Rearing
Even experienced beekeepers make mistakes when practicing queen rearing, especially early on. Some of the most frequent issues include:
Grafting larvae that are too old
Larvae older than 24 to 36 hours have already been committed to worker development, and queens raised from older larvae tend to be smaller and shorter-lived. Precision in larval selection is one of the true skills of queen rearing.
Weak cell builder colonies
A cell builder colony without enough young nurse bees or food reserves will produce fewer and lower-quality queen cells, regardless of how well the grafting itself was done.
Poor timing relative to drone availability
Queen rearing attempted before drones are sexually mature in the area often results in poorly mated queens, sometimes recognizable months later by a spotty, unreliable brood pattern.
Timing this correctly also matters for colony health more broadly, similar to choosing the best time to inspect a beehive.
Overcrowded or understocked mating nucs
Both extremes cause problems — nucs that are too small cannot support a developing queen, while overcrowded nucs can lead to unwanted swarming or supersedure before the queen has a chance to mate.
Rushing queen introduction
Introducing a queen too quickly without allowing the colony time to accept her pheromones is one of the most common causes of queen loss during introduction.
Tools and Equipment for Queen Rearing
Getting started with queen rearing does not necessarily require an expensive setup, though certain tools make the process considerably easier:
- A grafting tool (Chinese grafting tool or similar)
- A headband magnifier or grafting lamp
- Plastic queen cell cups and cell bar frames
- Mating nuc boxes (many styles exist, from full-size frames to miniature “baby nuc” systems)
- A reliable record-keeping system to track breeder colonies, grafting dates, and mating success rates across seasons
As your queen rearing program grows, many beekeepers eventually invest in Cupkit or Nicot systems to streamline the larval-transfer stage, though grafting remains the most widely taught and most flexible queen rearing method worldwide.
Seasonal Planning for Queen Rearing
Because queen rearing depends so heavily on weather, drone availability, and colony strength, successful programs are planned around the local beekeeping calendar rather than a fixed date. A useful approach is to work backward from your target date for new queens to be laying, allowing roughly six weeks total: about two weeks from grafting to queen emergence and mating readiness, one to two weeks for mating flights, and another one to two weeks to confirm a solid laying pattern.
Many regions support one or two well-timed queen rearing cycles per season rather than continuous production, since colony strength, drone populations, and weather conditions rarely stay favorable for queen rearing throughout an entire summer.
Queen Rearing as an Ongoing Practice
Queen rearing is rarely something a beekeeper masters in a single season. Acceptance rates, mating success, and overall queen quality tend to improve gradually as timing, technique, and breeder selection are refined year after year. Many beekeepers describe their first attempts at queen rearing as a humbling experience, with low acceptance rates and unpredictable results, followed by steady improvement once the underlying rhythm of the process becomes familiar.
Keeping detailed records — of breeder colony performance, grafting dates, weather conditions during mating windows, and the eventual performance of daughter queens — turns queen rearing from a one-off experiment into a long-term breeding program. Over several seasons, this record-keeping allows a beekeeper to make real genetic progress, gradually shaping an apiary’s overall temperament, productivity, and resilience.
Queen Rearing vs. Buying Queens: Making the Comparison
Many beekeepers weigh queen rearing against simply purchasing mated queens each season, and the right answer depends on scale, goals, and available time.
Buying queens is faster and requires no specialized skill, which makes sense for beekeepers with just one or two hives who requeen infrequently. However, purchased queens come from breeding programs optimized for broad regional appeal rather than your specific apiary conditions, and shipping stress can sometimes affect a queen’s performance after introduction.
Queen rearing, by contrast, requires an upfront investment of time and a genuine learning curve, but it pays dividends that compound over time. Beekeepers who commit to queen rearing gain control over genetics, timing, and cost, and many find that the knowledge gained through queen rearing improves every other aspect of their beekeeping, from swarm prevention to disease management. For anyone managing more than a handful of colonies, or anyone serious about breeding bees suited to their exact climate, queen rearing tends to become the more sustainable long-term choice.
Troubleshooting Low Acceptance Rates in Queen Rearing
Low cell acceptance is one of the most common frustrations beekeepers encounter when they first attempt queen rearing, and it is rarely caused by a single factor. If your queen rearing attempts are producing few accepted cells, work through this checklist:
Check nurse bee density
Cell builder colonies used in queen rearing need an unusually high concentration of young nurse bees relative to a normal hive. If the cell builder was assembled from older foraging bees rather than nurse bees, acceptance will suffer regardless of grafting technique.
Reassess larval age
Even experienced practitioners occasionally graft larvae that are slightly too old. If queen rearing acceptance rates drop suddenly, examine your breeder frames more carefully before the next attempt, and consider grafting from younger larvae than you think you need.
Review feeding
Cell builder colonies used in queen rearing should be fed a light syrup and have ample pollen available, since a dearth of incoming nectar or pollen can cause a colony to deprioritize queen cell production entirely
Watch the weather
Sudden cold snaps, heavy rain, or extreme heat during the grafting window can all reduce queen rearing success, since stressed colonies invest less energy in raising new queens.
Avoid disturbing cell builders unnecessarily
Frequent inspections during the sensitive first 24 to 48 hours after grafting can cause bees to abandon developing queen cells. Many experienced queen rearing practitioners resist the urge to check cells until at least two days have passed.
Frequently Asked Questions About Queen Rearing
How many queens can I raise at once through queen rearing?
This depends on the method and the strength of your cell builder colony. A single strong cell builder used in grafting-based queen rearing can often support 20 to 40 queen cells at a time, though beginners typically see better results starting with smaller batches of 10 to 15 cells while refining their technique.
Do I need special genetics to start queen rearing?
No. Queen rearing can begin with any colony that shows traits you value, whether that is a locally adapted survivor colony, a productive commercial line, or simply your calmest and most consistent hive. The genetics improve over time as you continue selecting breeder colonies across seasons.
Can queen rearing be done without grafting?
Yes. Methods like walk-away splits, cell punch systems, and Nicot/Cupkit systems all allow queen rearing without traditional grafting, making the practice accessible to beekeepers who are not yet comfortable handling larvae directly.
How long does the entire queen rearing process take, from grafting to a laying queen?
Plan for roughly five to six weeks in total: about two weeks from grafting to queen emergence, one to two weeks for maturation and mating flights, and another one to two weeks to confirm the new queen is laying a solid brood pattern.
Is queen rearing only for commercial beekeepers?
Not at all. While commercial operations rely on queen rearing at scale, hobbyist beekeepers with even a small number of colonies often take up queen rearing simply to produce a few backup queens each season, reduce dependency on suppliers, and deepen their understanding of colony biology.
Final Thoughts
Queen rearing sits at the intersection of biology, timing, and hands-on craft, which is part of what makes it one of the most satisfying skills in beekeeping. Whether you start with a simple walk-away split or work your way up to full grafting programs with dedicated cell builder colonies and mating nucs, queen rearing offers a level of control and understanding that buying queens from a catalog simply cannot match.
For beekeepers managing more than a hive or two, learning queen rearing is not just a cost-saving measure — it is an investment in the long-term health, temperament, and productivity of an entire apiary. Like most beekeeping skills, queen rearing rewards patience, careful observation, and a willingness to learn from imperfect first attempts.